• How to reset the Domain Admin Password under Windows 2012 Server? New!
• I've saved backup Registry SAM file as SAM20160315230333 in my flash drive. Why do I need it? New!
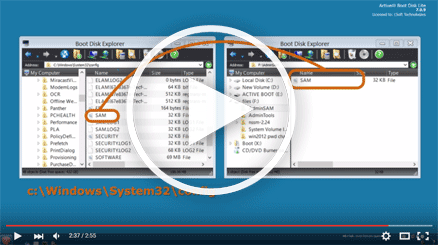
If your system became inoperable after you use Active@ Password Changer you can roll back all changes to the square one. To do this you have to:
1. Boot your computer with our Active@ Boot Disk (with Password Changer).
2. Find the folder "C:\WINDOWS\System32\config".
3. Move file "SAM" from this folder to any temporary folder - "C:\Temp" for example.
4. Copy your backup file from the flash drive (or other storage where you have it) to folder "C:\WINDOWS\System32\config"
5. Rename backup Registry file to SAM (just remove numbers at the end of the file name).
6. Reboot your computer.
• I have Windows 2012 server and it is a Domain Controller, and I have erased the Administrator’s password, but my server does not allow me login to the system with a blank password. Does Active@ Password Changer reset the DC’s local Administrator’s password? New!
Active@ Password Changer can reset the local Administrator Password. It is very important to log in to your server immediately after you reset a password, so boot your server with our boot disk, reset the Administrator’s password (Note: leave all checkboxes as they set by default, just press “Apply” button to reset the password), instantly after that reboot your server in Directory Services Repair Mode (press F8 while boot up and choose this option) and when the login screen appears, log on as Local Administrator. You now have full access to the computer resources, but you cannot make any changes to Active Directory.
• How can I reset a Window 8 Live ID Login password?
This procedure may be used to reset a Windows 8 type login account if you know some information about the user (running Password Changer is not required). We recommend using Active@ Password Changer Pro to reset the Windows 8 local Administrator's account to have proper access to the system.
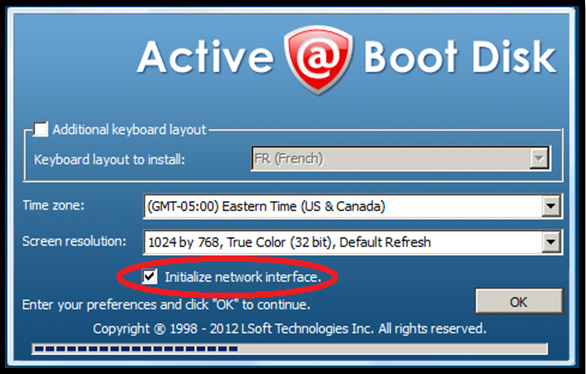
Boot with Active@ Boot Disk.
Mark the checkbox to Initialize network interface:
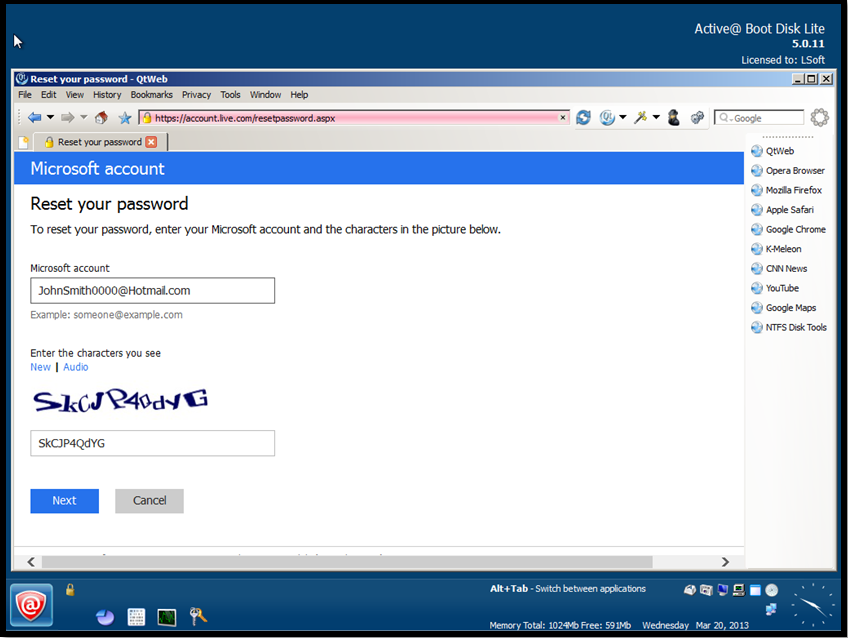
Run the included Internet browser ("Start" > "Internet" > "QtWeb Internet Browser") and type https://account.live.com/resetpassword.aspx in the browser's address bar and press Enter.
Enter your Windows live account e-mail address and type in the verification characters you see in the corresponding field just above the "Next" button, then press the "Next" button to continue.
Select the method for resetting the password which is most suitable to your situation. If you can't remember your account's secret question and details,
click on "I can't use any of these options".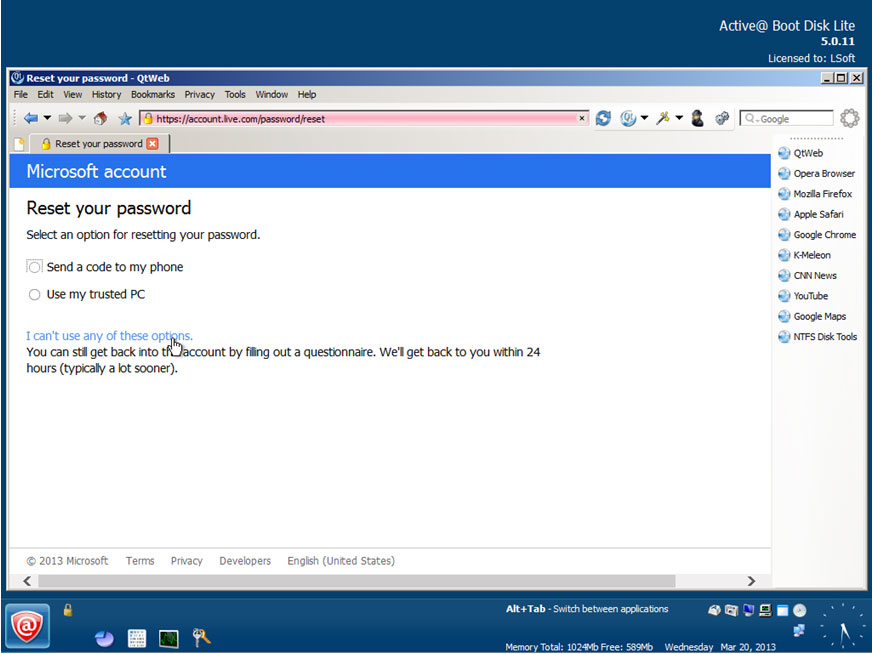
Enter your account's e-mail and contact e-mail address which Microsoft will use to send you information about your account,
then press "Next" again.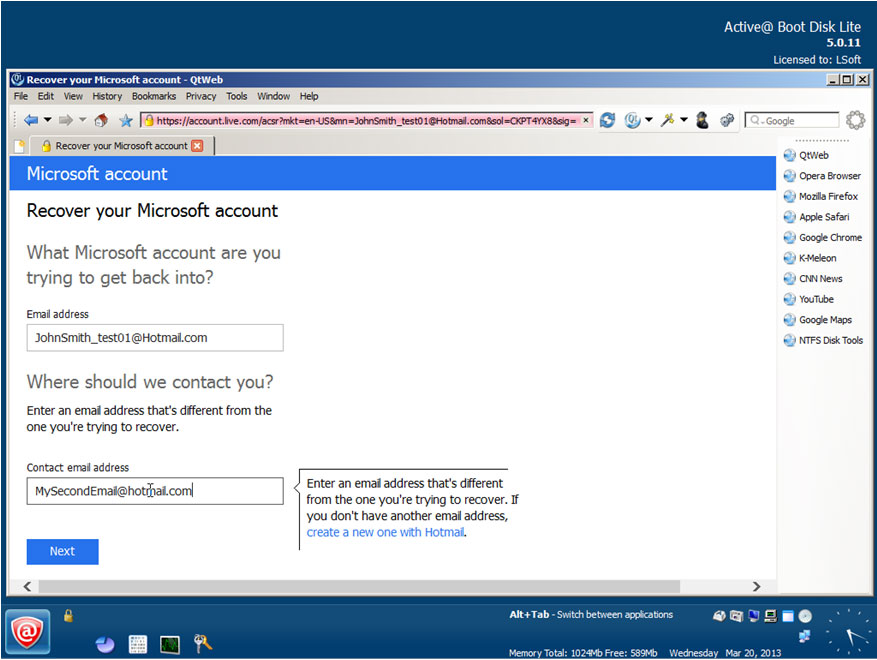
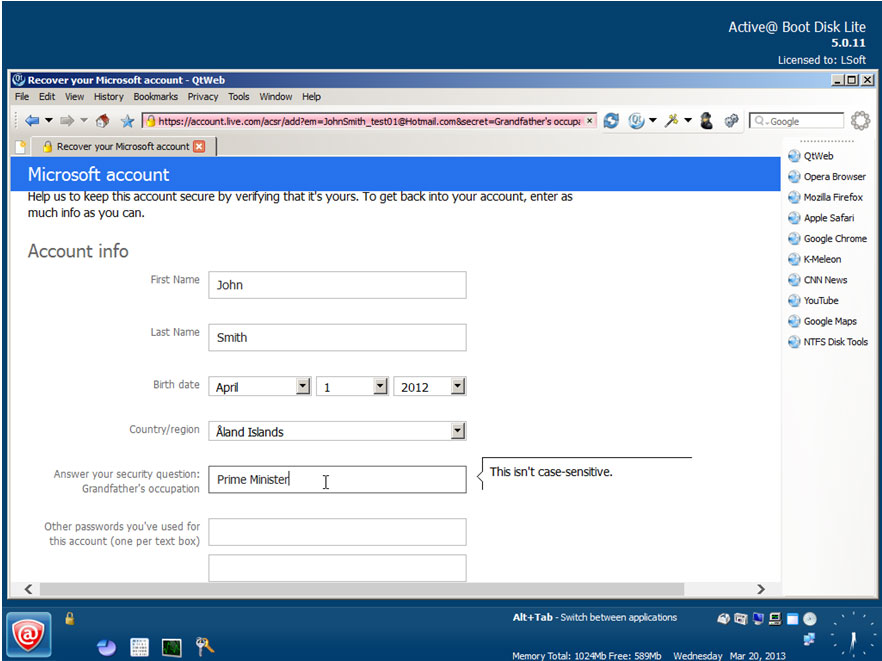
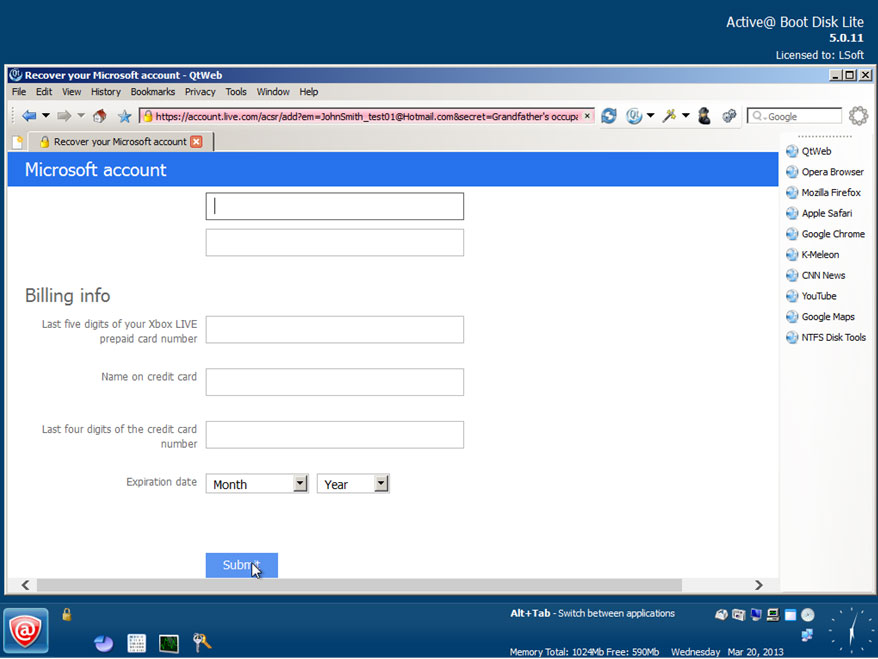
Fill out the requested fields and press the "Submit" button.
Remove Active@ Boot Disk and turn off your computer.
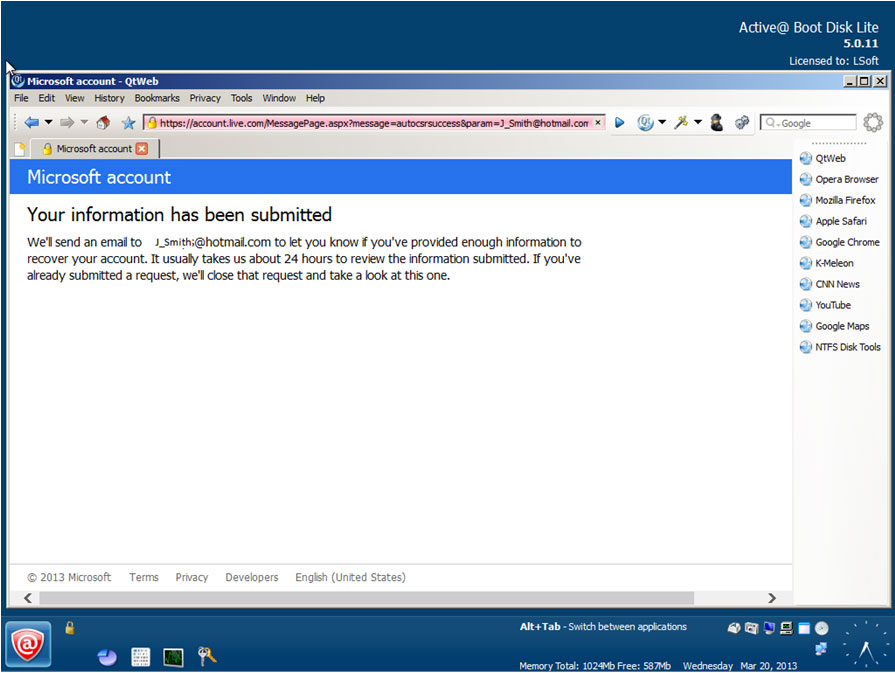
Access to your second e-mail (contact e-mail) account from any other computer via an email client or online e-mail program.
For example: Mail program on a Mac, and following the instructions by clicking on the provided link to reset your password:
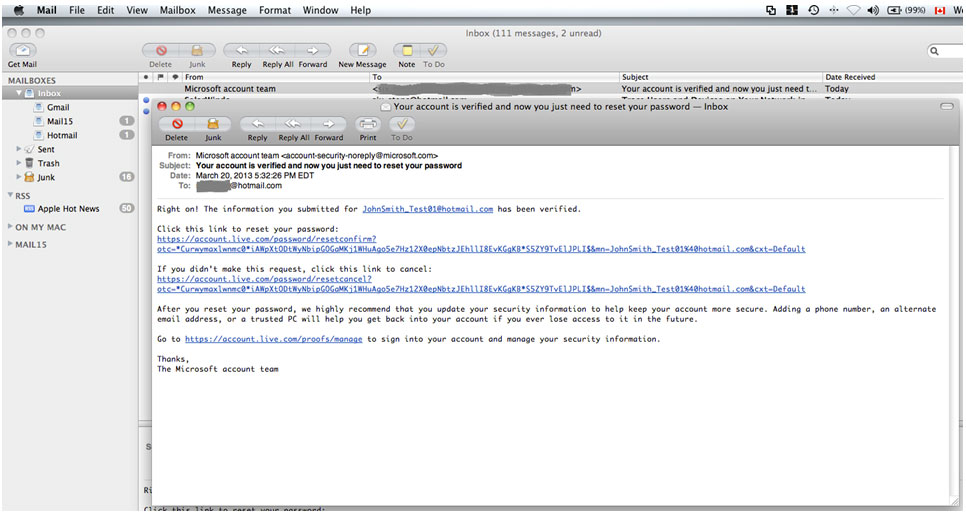
 Enter your account's new password and press "Next".
Turn on your computer and log in with your Windows Live account and new password.
P.S. Your computer has to be connected to Internet to make these changes.
• How to get to your Boot Menu or your BIOS settings?
Hot keys for BootMenu / BIOS Settings
How to get to your Boot Menu or your BIOS settings? Every PC has different hot-keys that go to these settings. This is a list of PC brands with their corresponding hot-keys.
| Manufacturer | Type | Models | Boot Menu | Boot Once | BIOS Key | Change Priority |
|---|---|---|---|---|---|---|
| ACER | Esc, F12, F9 | Del, F2 | ||||
| ACER | netbook | AspireOne, Aspire Timeline | F12 | F2 | ||
| ACER | netbook | Aspire v3, v5, v7 | F12 | The "F12 Boot Menu" must be enabled in BIOS. It is disabled by default. | F2 | |
| APPLE | After 2006 | Option | ||||
| ASUS | desktop | F8 | F9 | |||
| ASUS | laptop | Esc | F9 | |||
| ASUS | laptop | R503C | F8 | DEL | ||
| ASUS | netbook | Eee PC 1025c | Esc | F2 | Boot Tab, Boot Device Priority, 1st Boot Device, Removable Device, F10 | |
| COMPAQ | Presario | Esc, F9 | F10 | BIOS "Advanced Tab", Boot Order | ||
| DELL | desktop | Dimension, Inspiron, Latitude | F12 | Select "USB Flash Drive" | F2 | |
| DELL | desktop | Inspiron One 2020, 2305, 2320, 2330 All-In-One | F12 | Select "USB Flash Drive" | F2 | |
| DELL | laptop | Inspiron | F12 | Select "USB Storage Device" | F2 | Settings->General->Boot Sequence->"USB Storage Device", then up arrow, [Apply]--[Exit] |
| DELL | laptop | Precision | F12 | Select "USB Storage Device" from boot menu | F12 | |
| EMACHINES | F12 | Tab, Del | ||||
| HP | generic | Esc, F9 | Esc, F10, F1 | |||
| HP | desktop | Media Center | Esc | F10 | BIOS "Advanced" tab, Boot Order, Move "USB Device" before "Hard Drive" | |
| HP | desktop | Pavilion 23 All In One | Esc | Select boot media from the menu | F10 | BIOS "Advanced" tab, Boot Order, Move "USB Device" before "Hard Drive". For non-UEFI media, disable secure boot and enable legacy support |
| HP | desktop | Pavilion g6 and g7 | Esc | F10 | BIOS "Advanced" tab, Boot Order, Move "USB Device" before "Hard Drive" | |
| HP | desktop | Pavilion HPE PC, h8-1287c | Esc | Then F9 for "Boot Menu" | Esc F10 | Storage tab, Boot Order, Legacy Boot Sources |
| HP | desktop | Pavilion PC, p6 2317c | Esc | Then F9 for "Boot Menu" | Esc F10 | Storage tab, Boot Order, Legacy Boot Sources |
| HP | desktop | Pavilion PC, p7 1297cb | Esc | Then F9 for "Boot Menu" | Esc F10 | Storage tab, Boot Order, Legacy Boot Sources |
| HP | desktop | TouchSmart 520 PC | Esc | Then F9 for "Boot Menu" | Esc F10 | Storage tab, Boot Order, Legacy Boot Sources |
| HP | laptop | 2000 | Esc | Select "Patriot Memory" on the Boot Option Menu | Esc | |
| HP | notebook | Pavilion | Esc | F10 | BIOS "Advanced" tab, Boot Order, Move "USB Device" before "Hard Drive" | |
| HP | notebook | ENVY dv6 and dv7 PC | Esc | Then F9 for "Boot Menu" | Esc | F10 Storage tab, Boot Order, Legacy Boot Sources |
| INTEL | F10 | |||||
| LENOVO | desktop | F12, F8, F10 | F1, F2 | |||
| LENOVO | laptop | F12 | F1, F2 | |||
| LENOVO | laptop | IdeaPad P500 | F12 or Fn + F11 | F2 | ||
| NEC | F5 | F2 | ||||
| PACKARD BELL | F8 | F1, Del | ||||
| SAMSUNG | F12, Esc | |||||
| SAMSUNG | netbook | NC10 | Esc | F2 | Boot Tab, Select "Boot Device Priority", Press Return, Up/Down to Highlight, F6/F5 to change priority | |
| SAMSUNG | ultrabook | Series 5 Ultra and Series 7 Chronos | Esc | F2 | Boot Tab, Select "Boot Device Priority", Press Return, Up/Down to Highlight, F6/F5 to change priority | |
| SHARP | F2 | |||||
| SONY | VAIO, PCG, VGN | F11 | F1, F2, F3 | |||
| SONY | VGN Esc | F10 | F2 | BIOS "BOOT" section, "External Device Boot" enabled | ||
| TOSHIBA | Protege, Satellite, Tecra | F12 | F1, Esc | |||
| TOSHIBA | Equium F12 | F12 | F12 |
• I've reset local Administrator's password, but after re-boot on Welcome Screen I do not see user Administrator, just list of regular users. I have Windows XP. How can I log in as Administrator?
Operating System Windows XP (Home and Professional Editions) when booting suggests only names of regular users on Welcome Screen by default. Administrator's account is hidden. Press key combination Ctrl+Alt+Del two times to display Login Dialog Window and you will be able to type both user name and password. Type Administrator and use empty password.
• I downloaded the program, but what do I do next? If I try to run it, I get an error - I must login as administrator to run this program - which I obviously can't do... I saved the start up file and the password changer to a CD, windows boots up normally if I try to boot from the CD. How do I make this program run from a floppy? The program is too big to put on a floppy (1.55 MB).
Active@ Password Changer is a very small DOS based program (only 65KB) but Windows based installation package contains Active@ Password Changer DOS executable file as well as its User manual, Bootable floppy creator and ISO image for bootable CD-ROM creation. If you do not have administrative rights on your PC, you can start this installation package on ANY computer you have and use it for creation of a Bootable floppy or CD.
• I'm unable to find user Administrator in the list of the users after selection of proper SAM database in Active@ Password Changer. Where it is?
Most likely local Administrator account has been renamed due to security reasons. Active@ Password Changer always displays built-in Administrator's account on top (even it was renamed). Write down this account name to be able to type it in later on, after its password has been reset.
• Will the User Profile be saved, after user's password has been reset?
User Profile depends on User Name and Security ID (SID) so changing the user's password won't have any effect on it.
• Will the file restrictions be saved, after user's password has been reset?
File and folder security settings are based on User Security ID (SID) that is produced during user account creation and does not depend on user password. You can change your password as often as you wish without files/folders security settings changes.
• Do you have a Windows 98 version of Password Changer? Can Password Changer reset password in Windows 9x operating systems?
You do not need any software to remove local user passwords in Windows 95(98) operating system(s). Just find and delete the USERNAME.PWL file (where USERNAME is the name of a user account) and the user will have an empty password.
• Can Password Changer help me in meeting the complexity requirements (such as digits, small and capital letters, and length of password) set by the PC's Local Security policy?
Local Security Account Policy affects the new passwords setting process in Windows environment, but not existing passwords, even absolutely empty ones. So you can reset the password for this account with Active@ Password Changer then logon with this user account name with the empty password.
•I have erased the password using Active@ Password Changer on a system where the administrator is no longer with the company. The system is a NON ENGLISH (localized) version of Windows 2000. The Password Changer gave a message saying that the password was changed, but system is still asking me to type the password ("Wrong username or password").
It is possible that the "Administrator" account in your localized version is renamed (for example "Administrateur" in French version), or has national (non English) symbols. Try to start Active@ Password Changer and find out the real username for "Administrator" account. It has to be first in the user's list with RID = 000001f4. Write down this username and use it for login.